Now that most schools around the country have started remote learning, teachers are starting to realize that teaching with a school-issued laptop might not be enough to cut it. Having all your students on a Zoom call while managing your Google Slides can fill up your screen quickly. In my recent virtual PD sessions with schools I’ve been “pulling back the curtain” to show staff how my workstation has evolved to optimize virtual teaching and learning. This article highlights those tools and techniques that I’ve found have had an impact on engaging students but also made my remote teaching life much easier. As teachers don’t have unlimited funds, I’ve listed these in order of personal preference and given some pricing examples when applicable.
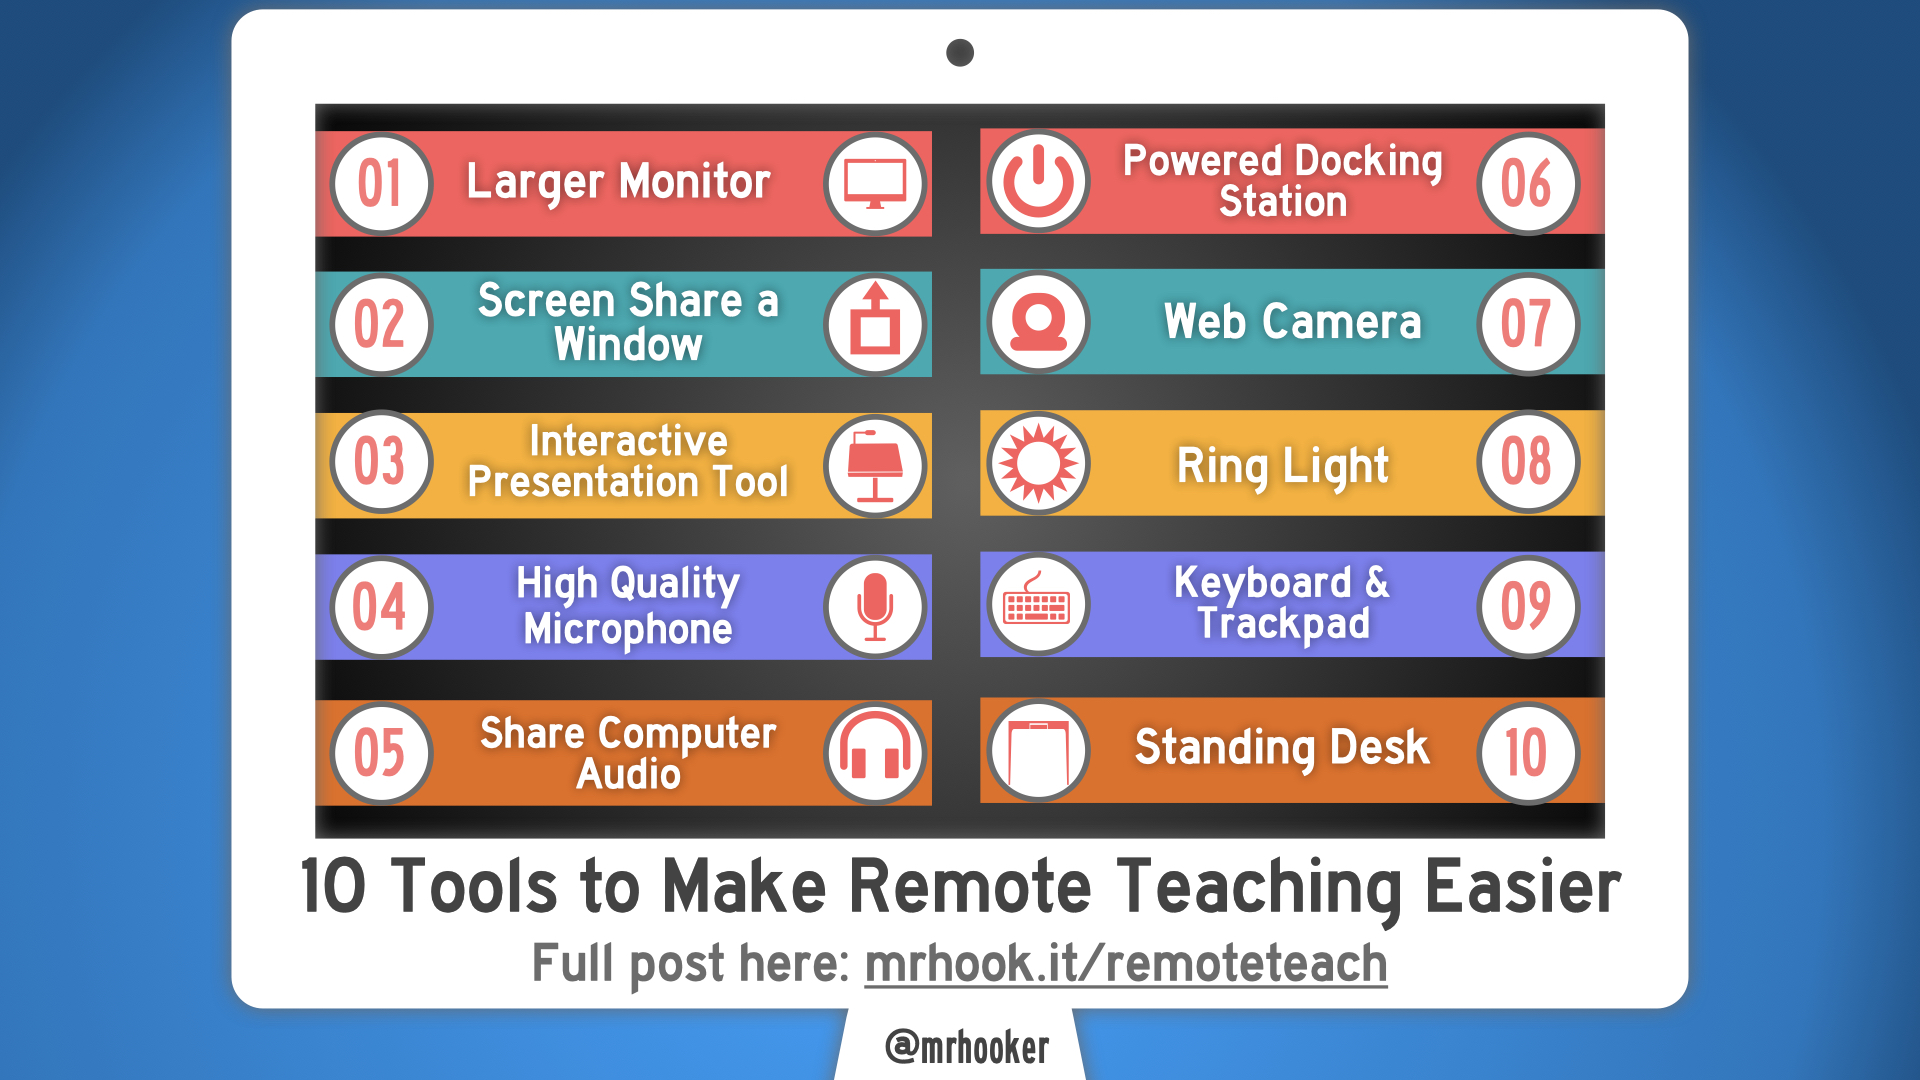
1. Large monitor
This is my number one item by a mile when it comes to virtual teaching. You have to have some decent screen real estate in order to use all the great learning tools available to you easily. I know some people prefer having dual monitors, but as many laptops don’t have the ability to support two screens without major adaptors, I would say find a large scale monitor that can plug into your laptop to either mirror the screen or extend it. This will allow you to have your students on a grid view while sharing part of your screen with them as well. As you’ll see in the example below, it’s almost impossible to do all of this while on a 11″ screen. Here are four different monitors that aren’t going to break the bank but will help you optimize screen real estate: (Note: Make sure the monitor will work with your laptop before purchasing)
LG UltraWide 29″ – Sam’s Club – $189
Samsung 32″ Curved – Walmart – $199
LG 32″ Class FHD – Costco – $179
AOC 32″ Curved frameless – Amazon – $199
2. Screen share a window instead of full-screen
If you have a larger screen, you’ll want to put it to good use. Whenever I’m in a Zoom or Meet session, I use either Keynote or Google Slides to present as both tools come with built-in “play slideshow in window” settings versus presenting in full screen. Why is that important? Once you present in full screen, it becomes harder to manage the video call controls and any other items you might want to push out. Here’s a look at my screen during a recent virtual training:

As you can see, there’s a lot going on here. Not only am I sharing my slides, but behind the scenes I’m doing a few other things to keep the students engaged like pushing out polls or brainstorming walls. I even have some little virtual “sticky notes” as reminders for myself that the students can’t see. Whenever I’m in this view on Zoom, I just click “New Share” to toggle between windows easily and not having to turn off screen share.
3. Interactive presentation tool
Sharing your screen is the first step, but there will be times when you’ll want your students to interact with you in some ways. You can drop links to various tools in the video chat or LMS of choice, but to cut down on transition times, you can keep students in the same place with you by using an interactive presentation tool like Nearpod or Pear Deck. I use these tools with almost all of my remote presentations now as it keeps the virtual attendees following along with me. I can continue to screen share my slides while also moving them along in another window. This can be challenging for students with a small device as they might not be able to have 2 windows open at once. In those instances, I have the students minimize the Zoom window so they can hear my voice and follow along. Because you can embed links in the Nearpod, I push out polls, Padlet walls, and even virtual bingo cards with little to no disruption or time spent on transition.
4. High Quality Microphone
I’m listing microphone before camera for a reason. Having high quality audio is so much more important than having a high quality video (not to mention the bandwidth pull on your internet). I know your laptop or headphones might have a microphone already, but spending a little bit on a better quality mic will help you not only with your synchronous video classes, but will help you sound great while recording asynchronous audio instructions. Microphones range wildly in price and you do get what you pay for. Here are a few including the top one which I own:
Blue Yeti USB Mic – Walmart – $114
Rode NT-USB Studio Quality – Amazon – $179
ATR2100x-USB – B&H Photo – $99
5. Sharing computer audio
Even thought teaching remotely isn’t as personal as teaching in-person, you still want to try and create an atmosphere for your students as they join the call. Playing audio out of your speakers and into your microphone can sound choppy. If you are using Zoom (or Teams for PC), you can share your internal computer audio for high quality sound. In order to do this, you have to share your screen (I usually have a welcome screen up when students join) and then check the box that says “Share computer sound”. (see below)

Create some thematic playlists or just have some light background jazz playing as they enter or as they are on breaks throughout the class. Music can set the tone for the day!
6. Powered Docking Station
Unless you are using a desktop PC or iMac, you’ll need to get a docking station for your laptop to make this all work. Depending on your computer, you might need adapters to plug everything in and while that might work temporarily, it’ll draw on your power supply even when plugged in.
I recently did a full-day training and virtual Keynote but didn’t have my powered docking station as I was isolating away from my house at the time. I had all the things mentioned in this article plugged into my MacBook Pro. As the day went on, I didn’t notice but my MBPro was slowly running out of charge (even though it was plugged in). Turns out, I was running so much off the machine, it couldn’t keep up and by the time my afternoon keynote started, my entire system started to melt-down. (FYI – most laptops will slow down their operating system when battery gets below 5%!)
I learned my lesson that day and now don’t go anywhere without my Belkin USB-C Express Dock. I’ve tried other models, but since this one is powered, it doesn’t slow down any of my systems and really is the magic to tying in all the other components of my remote teaching workstation.
7. Web camera
Most laptops come with built-in web cameras, but sometimes you might need a camera that you can move around easily and isn’t attached to your computer. Luckily there are some cost-effective USB options out there that will do the trick. Here’s just a few that you could use including the first one which is the one I own:
Logitech C920e Webcam – Amazon – $116
NexiGo 1080P HD Webcam – Amazon – $39
Lenovo 500 FHD Webcam – Lenovo – $69
8. Ring Light
As we get further down the list, these last few items I would list as “nice to have” but certainly not necessary. You could use some lamps around your house to create better lighting for your video calls. In general, you’ll want to avoid background light (like a window behind you) to avoid being washed out. If you have a little extra in your budget, you could also purchase a fairly inexpensive ring light. I purchased this model which also happens to work with my webcam mentioned above and has a variety of built in brightness and color settings. Stay tuned for my next make-up tutorial on Youtube! (I wouldn’t do that to y’all)
9. Additional Keyboard & track pad
At this point, my laptop really just acts as the hub and operating system. When I plug it into my Belkin dock, the lid stays closed. In order to do that, I bought an extra keyboard and magic trackpad to plug into my dock. I prefer the hardwired keyboard vs. bluetooth just because it’s one less thing to charge. The great thing is, when I go back on the road to do public speaking or back into the physical classroom to teach, I can just unplug my laptop quickly and take it with me. When I get back, I plug it into my dock and everything automagically connects.
10. Standing Desk
“Zoom-butt” is real. If you are in and out of remote classes all day, you’ll want to make sure you have a way to stand up. You don’t have to buy a top of the line standing desk for this either. Sometimes you just need a stack of books or a counter top to set your computer on. As I assembled all of the items above, I found that having a milk crate for my monitor wasn’t doing the trick, so I decided to do some research and find the right adjustable standing desk for me. Here are a few I came across including the first one that I ended up purchasing:
Bekant Desk Sit/Stand – IKEA – $449
Flexispot Electric Height Adjustable Desk – Amazon – $279
Flash Furniture Sit-Down/Stand-Up Desk – Office Depot – $259
Summary
The items on this list took me months to accumulate and several hundred remote teaching sessions to master. While having my ideal set-up did hurt my wallet some, it eased the stress and agony of teaching remotely from my laptop daily. Ultimately, you’ll have to decide what works best for you this year. My hope is that a couple of the tips and tools mentioned in this article will help make your remote teaching easier which in turn will keep your students engaged and excited to learn from you every day.
I cover this topic as all as modules around engagement, assessments, collaboration and more in my new course The Remote Learning Coach. Check out the full syllabus here.
Here’s a look at my completed station:

There is no need for so much research really. It is quite basic what one needs. To me it is this list: 2 good 24″ monitors, which solves instantly (!) the share screen and presenter’s view screen issue… the cheapest professional mic you can find, such as a Prodipe one (their quality for voice is excellent), one FHD webcam and… that’s that. Of course the standing desk is not necessary unless someone has the budget and wants it. It makes a great difference if you get tired sitting, but it is not necessary.
The point of the article is to give people options. I wouldn’t necessarily find that everyone would get or do everything off the list. As you said in your reply “to me it is this list” – everyone has preferences for their set-up and I know this list is far from ideal (and a little pricey). Just sharing ideas.
Pingback: How To Teach English Online? - Become Fluent Today
What setup to you use to write on your slides or whiteboard creating block diagrams?